

2012
QUALITY AND WORKMANSHIP
01 December 2012 00:00 Filed in: Workmanship
When it comes to quality and workmanship I don't buy the "it's a boat" and "the other boats are worse" argument ... it's not conducive to progress and advancement.
I wish Chaparral and Chaparral boat owners would strive to compare their boats with the best. This would really help Chaparral Boats to improve their boats' quality. The boats already look good, they need to be made better now.
Western world boating industry poor workmanship and loose quality control are embedded in the industry culture, and the industry does not see the problem with the end product.
What's coming? Same or better quality for half the price, and Made in China. This will send a shock wave throughout the western world boating industry ... and could be a devastating one. The shift has already started ... if one cannot compete on quality nor on cost, one is doomed.
STERNDRIVE: PAINT OR NOT TO PAINT?
01 November 2012 00:00 Filed in: Maintenance
Volvo Penta drive painting procedure
derived from VP 2006 Engine Operator’s ManualPARTS
- Part # 1141562 … Primer
- Part # 827502 ….. Clear Enamel
- Part # 3851219 … Paint, Drive Unit, Silver
- Part # 889968 ….. Drive Touch-up Paint Set: Silver + Clear Enamel
- DuPont 225S Aluminum Refinishing System Step A, Aluminum Metal Cleaner: an acidic metal cleaner and conditioner formulated for aluminum. DuPont 225S effectively removes corrosion resulting from weathering and prepares the surface for the use of DuPont 226S Aluminum Refinishing System Step B, Conversion Coating.
- DuPont 226S Aluminum Refinishing System Step B, Aluminum Conversion Coating: DuPont 226S was developed for use on aircraft, boats, commercial and other vehicles exposed to severe conditions. DuPont 226S chemically stabilizes aluminum, producing a high degree of corrosion resistance and adhesion for paint systems.
- Zinc Chromate, a potential substitute for Dupont 225S and 226S set: for use on aluminum surfaces above or below the waterline, this primer chemically etches into aluminum and forms a corrosion-resistant surface, it helps to create an even, bondable surface for top coat adhesion.
- 3M Scotchbrite Pad Medium
PROCEDURE
1. Remove all marine growth.2. Remove all loose paint and corrosion by sanding or sandblasting. If sandblasting, use an aluminum oxide blasting media with a particulate size of 0.008-0.028 in. (0.2-0.7 mm).
3. Remove all trace of grease and wash with hot water and detergent. Roughen all painted surfaces with medium 3M ScotchbriteTM pad. Rinse thoroughly with water.
4. Treat any bare aluminum with chromate conversion coating. Clean the entire area with an acid cleaner that does not contain fluoride, such as DuPont® 5717. Scrub the surface with 3M ScotchbriteTM pad until it is completely “wetted” with no beads of water.
- NOTE: Fluoride in a cleaner causes a “smut” (dark discoloration on silicon-alloy aluminum castings), and paint will not stick to “smut”. If this happens, sand the surface and start over using a different acid cleaner.
- NOTE: Do not use steel wool. Small pieces of steel wool become embedded in the aluminum and will cause severe corrosion.
5. Rinse thoroughly with water. The area must appear “wetted” or the surface is not clean, and paint will not adhere.
6. While the surface is still wet from rinsing, treat all bare aluminum with DuPont® 226S chromate conversion solution. Brush the chromate solution as required for 2 to 5 minutes to prevent it from drying on the surface. Rinse the surface thoroughly with water and allow to air dry. Follow the label instructions exactly.
- If the chromate is allowed to dry anywhere on the bare aluminum surface, chromic acid salts will form which will prevent paint adhesion and promote corrosion. Sand the surface to bare metal.
- It is best to let the part air dry, but if you must wipe the surface to speed up drying, use lint free wipes not treated with anything that may contaminate the surface. Do not scrub the surface, wipe very lightly.
- Do not blow dry with shop air unless it is completely free of dirt, oil, and water.
- Do not heat the part above 150°F, before painting.
- Do not touch the treated surface with bare bands before painting.
- The part should be primed soon after it dries, or at least within 24 hours.
8. Apply finish coat.
The parts catalogs list numbers for finishing products … see above.
BOAT DESIGN AND STEERING
01 October 2012 00:00 Filed in: Seamanship
FWIW ... my boat is a single engine sterndrive boat, without a bow thruster. We did a lot of cruising in the last two years visiting many unfamiliar marinas. After having trouble backing into the various slips and docks, I know my next boat will have TWIN ENGINES, OR BOW THRUSTER, OR BOTH.
I used to be able to dock small trainer 22-30' sloop or ketch sailboats anywhere while single-handed. When we got this small 29' express cruiser I knew I will have to learn some and practice a lot. So, I did … and still after two years I have issues docking our new to us boat in certain wind conditions.
At first it was expected. I thought that I did not have enough experience and feel for the boat to back it into the close quarters nicely … but the situation has not gotten much better during second season last year.
Frustrated, I took her into a protected open space harbor, no waves nor current, just wind. I tested how the boat reacts to wind while in powerless drift, and while under power in reverse. Surprise, the boat's natural drift position is 30-40 degree into the wind (close hauled) and not into the wind (in irons) as one would hope a well designed (sail)boat would do.
Furthermore, the idle power in reverse cannot overcome the force exerted on bow by wind stronger than 5 knots. It is not possible for this boat to turn its bow into the 5 knot wind while idling in reverse. This effectively makes docking in reverse impossible in windy conditions without pulling a throttle a bit harder which is a risky thing to do in close quarters. Forget about backing while facing the wind. The boat will swing from one tack to another once the bow crosses the wind faster than I can think "oops …”.
This boat behaves like a weather vane facing the wind wrong way. The reason is a fancy looking hull design with high bow with deep concave walls that act like well trimmed sails ready for close hauled action. Another side effect of this design is that the boat does not stay put on anchor in light to moderate wind conditions. It constantly swings 40 degrees to either side, like a pendulum … and drags the anchor as a result.
Go figure!
LEAKS … NOT JUST VIA DRAIN HOSES
01 September 2012 00:00 Filed in: Workmanship
Okay, the boat’s swim platform leaks ... still … at the rub rail. It used to also leak badly around upper thruhull drain of the vent that connects top and bottom of the swim platform.
That drain was not sealed at all, any rain or wash over it from wake used to put significant amount of water into the inside of swim platform that then drained to bilge. In addition, there were missdrilled thru holes under each hinge and bracket holding hatches and swim ladder. Literally and without exception, there are two additional and unnecessary holes under each and every hinge and catch … looks like Chap change its mind on hinges and hatch catches in the middle of production cycle. They were not repaired nor sealed. The correct mounting holes and screws were sporadically and poorly sealed. All this also drained into the inside of swim platform.
Another significant source of leak was anchor locker. There was a gap/crack between locker's floor and hull b/o the drain holes that were drilled too low. The cracks in the connection between locker's floor and cabin bulkhead can be also a source of water leaks.
There was also a lot of rain water coming from various unsealed ports and openings (fresh water port, waste pump out port, shower and fuse build in boxes, etc). The retractable cleats also collect some water, and the drain hoses were either not existing, not connected, or too short to divert rain water directly to the bilge. This is probably not a significant concern in Texas and Florida.
Another suspects with potential of flooding and damaging the hull's core are any truhulls, especially those which are constantly under water: seacocks, transducer, tie down eyes on transom, etc.
I did a lot of investigation and remediation of various leaks last year when the boat was still dry and on trailer. First, I identified and remediated all rain water leaks. Then I flooded the bilge and discovered some very troublesome leaks around the thruhulls ... watch for the leak around the bonding wire screw that goes all the way thru to the seacock scoop. The bonding wire screw was not sealed at all on the bilge side (which was constantly submerged with bilge water). There was no enforcement or oversized washer to spread the load so the gelcoat all around it was cracked and collapsed a bit.
In the process of repairing and resealing all screws holding seacocks inside and scoop outside I discovered that the holes drilled are oversized and go past the core almost thru the entire hull thickness to the gelcoat on the other side. They were poorly sealed as well ... yeah, you can hardly seal an oversized hole ... needs to be repaired first. The screws were just dipped in sealant and plugged into the oversized holes … they were holding nothing.
Later during the season I discovered that one of tie down eyes is leaking but that could be a result of a too aggressive tie down performed by the storage/haul people. I have removed the eye before storing the boat in a heated storage to let the hull vent and dry, and I will address this before the next season splash.
I think I repaired most of the critical leaks. Others, like the swim platform leaks via rub rail ... one more for the "before the next season" to do list.
In conclusion
Some observations based on experience:- retractable cleats with drain boots missing drain hoses or not connected to them, or drain hoses too short to direct water to the bilge,
- thruhull holes for screws holding hinges, swim ladder, and other hardware being too large for the screw diameter and not sealed at all,
- misdrilled thruhull holes concealed under hardware and never repaired with gelcoat or even sealed,
- swim platform vent thruhull drain not being sealed at all,
- anchor compartment drain holes drilled too low and therefore opening gaps between locker floor and hull, never repaired with fiber/gelcoat ... instead, a poor and ineffective attempt with silicon sealant was made which made it a lot harder to repair it the right way,
- seacock mounting screws holes drilled too large for screw diameter and going thru the fiber all the way to the core ... like somebody needs more holes in the hull ... instead of using seacock mounting plates infused with fiber or glued to gelcoat,
- many screws mounting things inside the boat are too long and/or pilot holes are drilled thru nearly the entire thickness of the hull (gelcoat micro cracks on the outside),
- deck/hull shoebox connection under rubrail poorly sealed ... still need to investigate the details of this one,
- and last but not least, the hose runs and levels ... going up above the drained area so it never drains.
N2K OR NOT N2K?
01 March 2012 00:00 Filed in: Maintenance
NOT … TOO EXPENSIVE FOR THIS BOAT … 
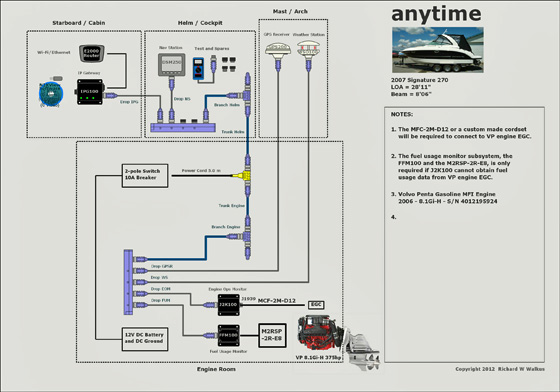
Click on the image to view its larger version.
Click on the image to view its larger version.
HOW TO IMPORT BOAT TO CANADA
01 January 2012 00:00 Filed in: Boating
There is nothing a boat exporter need to report to the US officials. The following applies to a boat importer crossing the Canadian border.
I do not know how the boat import is done on the water but from my many border crossings on land and on water, I would suggest doing it via land border crossing. Canadian Border Services Agency (CBSA) seems to be better prepared for clearing major imports on land.
You need to have a bill of sale with all the details including HIN and price, as well as the deed/title already transferred. All supporting documents like an ad with boat description, a seller offer, and anything else to support a declared purchase price ... especially if one has gotten a great deal … could prove to be helpful.
You need to be there in person, or hire a bonded broker to represent your interests at the border (big waste of money, imho).
Just drive to the crossing, clear your person, and they move you to the office area. You can also arrange with the hauler to meet up at the office. The officer checks the HIN, purchase price, and you pay GST and PST ... 13% total if you reside in Ontario. You pay it right there, and they accept major credit cards. Really painless process if all papers are in order ... 30 mins and you are done.
Importing a transport trailer is a bit more complicated ... ask me for details if this is your case.
If the boat is in Canada for a period of time longer than 6 months, it needs to be licensed. You license the boat with, and get a license number from, Transport Canada. I think it was free, and the license is valid for 10 years.
As far as Canadian Coast Guard (CCG) is concerned ... nothing to do. Amazingly, nobody asked for nor checked boat's compliance with Canadian standards. Once the boat is in water, it must be equipped with CCG required and Transport Canada approved safety equipment as specified for your type of boat.
I do not know what would be involved when registering the vessel with CCG ... but you do not have to do this if you are planning to stay in the waters of Great Lakes and tributaries.
Please verify the current procedures with CBSA here.