

REMEMBER THE RULE OF THIRDS
01 September 2015 00:00 Filed in: Seamanship
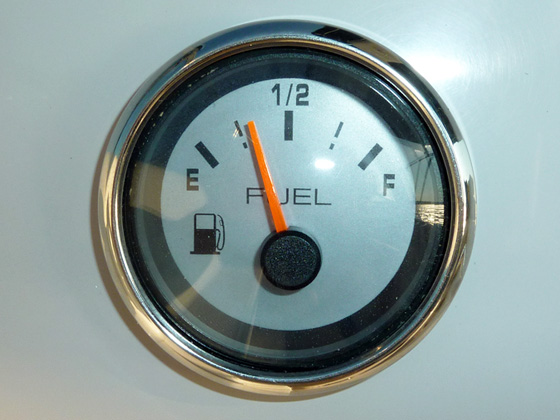
Use the first third of your available fuel to get to your destination; save the next third for getting back to the dock; and keep the remaining third for reserve.
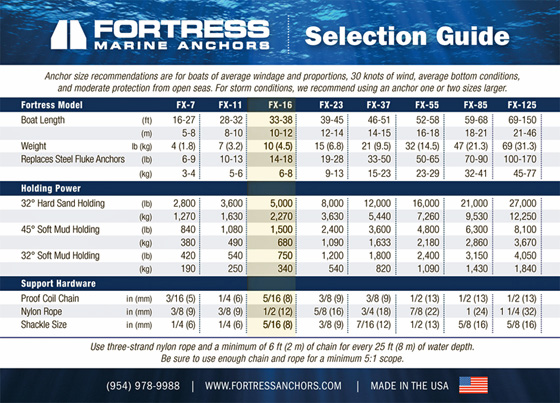
NEW ANCHOR …
01 March 2015 00:00 Filed in: Seamanship
Fortress FX-16 … one size oversized. Hope this one will not drag.
TIPS FOR PROPER DOCKING … AN ARTICLE
01 December 2014 00:00 Filed in: Seamanship
Banishing Your Fears: Tips For Proper Docking
Published by Passage Maker at passagemaker.comStory by RUDY AND JILL SECHEZ on August 5th, 2014
It is understood, at least on our boat, that coming to or leaving a pier is not ‘social hour.’ Instead, it is important to remain focused on the job at hand, and the more difficult the docking, the more focused you must be.
One day, as I was on the dock, I watched a fairly new-to-boating couple bring their mid-sized boat in to tie up. Difficulties ensued and the docking procedure disintegrated into much yelling, running around, and confusion.
I ran into that couple later in the day and during our discussion they mentioned that their docking routine usually ended up with the same result that I had witnessed. They were ready to give up on boating because this end-of-the-day routine always ruined any pleasure that boating might otherwise have given them.
As we continued our discussion, a few ideas were tossed around and they started to realize that they were neglecting a few pre-docking preparations that might help alleviate many of the problems they were having.
One procedure they decided to adopt was to first stop at a comfortable and safe distance from the slip and discuss things such as wind and current, what the captain’s plan would be, and line handling, along with any other topics that might be germane. Only after the fenders and docklines are in place, and the boat poles are readily available, would the docking proceed.
Although we’ve become much more adept at docking a boat than we had been earlier in our boating career, we still, to some extent or another, go through a procedure like this ourselves, even today. We’ve also discovered that it’s a good idea to have a similar discussion before leaving a slip, too.
DON’T BE VAGUE
We noticed right away that the folks docking and tying up their boat exchanged vague instructions and requests—the primary reason for many conflicts on board. It took Jill and me years before we finally realized this. Her idea of “a little bit” was much different from my idea of what “a little bit” meant.
Now, we try and make our instructions and requests as clear and as specific as the circumstances require. Many times it is not, “Give me some slack,” but instead, “Give me 3 feet of slack.” Not, “You’re getting close,” but instead, “You’re 3 feet from the pier.” Not, “Let’s move the boat forward a little bit,” but instead, “Let’s move the boat 2 feet forward,” and so on.
There are also a few basic skills that every boater should practice. One of these is that every crew member that will assist in docking the boat must be adept at throwing a rope. It’s not difficult to learn how to throw a rope, but you cannot simply just read about it. You must practice doing it.
In order to successfully throw a rope, you must throw lines that are long enough, because throwing lines that are too short will make both the thrower and catcher look foolish.
HOW LONG IS LONG?
So, what does “long enough” mean? For us, “long enough” means the rope should, if thrown accurately, extend eight to 10 feet past the receiver, providing a reasonable measure of time for them to reach and grab hold of the line before it slides into the water. So, keeping in mind that the boat may often still be 10 feet or more from the pier when the line is thrown, for most recreational boats in the 30- to 50-foot range, “long enough” means lines that are 30 to 40 feet in length, or longer, if necessary.
Also, the captain needs to know how to maneuver the boat, and this skill is another one that only comes with practice. The captain should practice frequently, and away from all encumbrances until he or she is comfortable doing it. Then, the captain can progress to the next stage—practicing in tighter quarters with adverse wind and current.
Jill and I practice docking by ourselves every chance we get, when the wind and current are cooperative. We like to forgo the pier committee’s help, unless thing get out of control. You can learn some great lessons from smashing into a piling or seawall.
The captain does not necessarily need to be the one at the helm so, he or she must also become adept at passing instructions to the helmsman and be able to do so succinctly and in a timely manner.
DISCIPLINED APPROACH
To avoid confusion on our boat, the crew follows the captain’s instructions. The last thing we need is for the crew to follow directions from someone trying to be helpful, while the captain is planning and attempting to do something else.
So, when the local dock committee comes scurrying down the dock, chomping at the bit to be helpful, we ask them to stand by. If necessary, we’ll tell them two times or more — as many times as is necessary to get them to not interfere.
It is also understood, at least on our boat, that coming to or leaving a pier is not “social hour.” Instead, it is important to remain focused on the job at hand, and the more difficult the docking, the more focused they must remain on the job. If folks on the pier keep providing distractions, we try to suggest that if they give us a few minutes to get the boat tied up, we’ll then invite them on board. If necessary, we’ll also ask them to quiet down, so everyone can hear the skipper’s commands. We’ll always ask for help when another boat has been damaged by our boat though.
With the proliferation of bow thrusters and stern thrusters, docking a boat without them—especially a single-engine boat—seems to be a lost art, but it doesn’t have to be. In fact, whether or not your boat has a thruster or two, it’s still useful to practice docking your boat without them.
Granted, some of these ideas may not apply to all boats or in all circumstances, but it’s important to develop good habits early because it may come in handy one day, particularly in a situation where there is little time to think.
Direct link to this Passage Maker Article … HERE
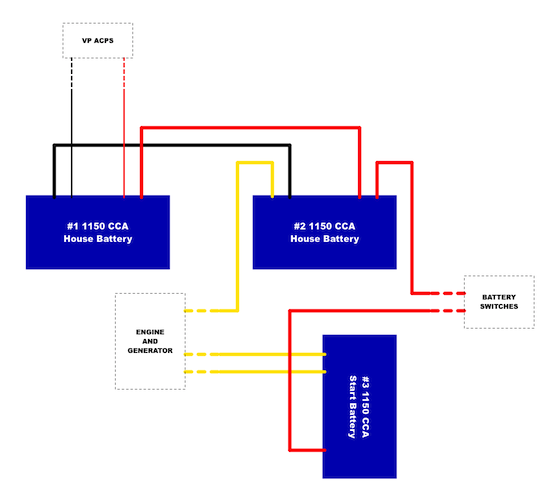
THE VSR CONNECTIONS … MEMO TO SELF
01 November 2014 00:00 Filed in: Maintenance
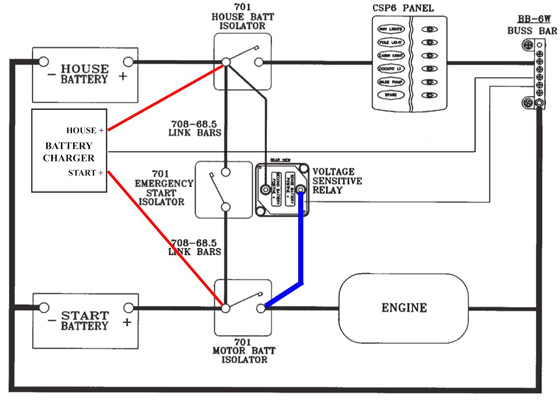
Double check the connections on the boat … red and blue wires. This is how it is supposed to be done to isolate batteries when charging with battery charger powered by shore power or generator.
RADAR … THE FIRST IMPRESSION
01 October 2014 00:00 Filed in: Seamanship
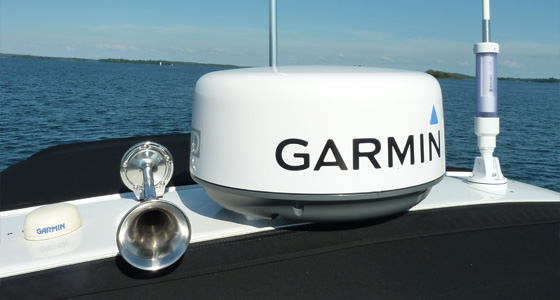
I have installed a radar ... I was a radar trainee this season. I had a number of day runs with the radar on in various weather conditions. A few observations ...
At coasting speeds, 7-10 mph, with the bow down ... the target resolution is very good. All boats, nav aids, and smaller (plastic?) private buoys show up. Even a white swan showed up on screen as a consistent target.
At cruising speeds, 28-32 mph, with the bow up ... the bow, railings, and fenders partially cover the closer targets. That was not a noticeable issue at slower speeds. There were instances that a buoy did not show up on the screen, or only flickered every other radar revolution, etc. Also, at higher speed, the chart gets out of sync with targets shown on screen, especially when the course is not a straight line. An electronic compass assisting chartplotter with keeping the correct heading at all times should diminish this issue.
The target resolution and display gets more inconsistent in heave seas. There was a 20 by 6 foot shoal made of rocky rubble and sticking out 2 feet that did not show as a consistent elongated target but only as a flickering bunch of smaller targets.
In choppy seas there is a lot of false positives. The waves and confused seas show up on the radar as various confusing patterns. Still, you can distinguish between them and the real targets like other boats and nav aides but it takes the attention away from navigating. I don't think one would be able to easily see small/soft targets like a kayak.
It's another tool and an aid while navigating. I see the radar as being a valuable and dependable tool in poor visibility while going slow ... which should be an MO in such conditions anyway.
IGNORANT OR ARROGANT?
01 September 2014 00:00 Filed in: Seamanship
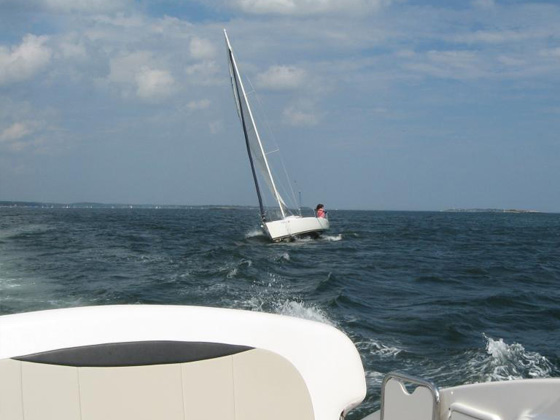
This power boater executed his imaginary “right of way” … not realizing how contrary to the nav rules this maneuver was. Too ignorant to know, too arrogant to learn … perhaps?!
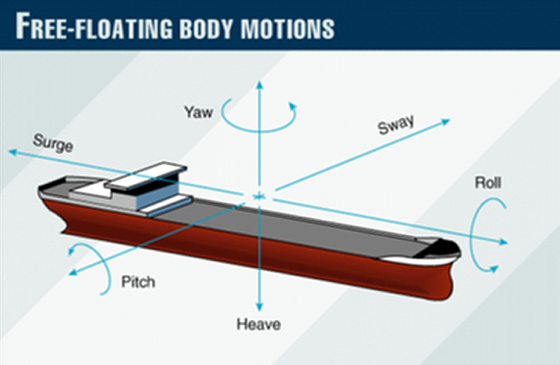
SWAYING OR YAWING AT ANCHOR Part 2
01 August 2014 00:00 Filed in: Seamanship
After some experimentation … there is no hope for my boat. It sways no matter what. I found this simple setup emulating a primary bridle on all chain rode minimizes the swaying but does not eliminate it.
MEMO TO SELF … NEW BATTERIES INFO
01 July 2014 00:00 Filed in: Maintenance
3x AGM DieHard Platinum Marine 31M 1150CCA aka ODYSSEY 31M-PC2150
All three batteries purchased in April 2014 and deployed in June 2014.
Dimensions
• Height (in.): 9.5
• Item Weight (lbs.): 75
• Length (in.): 13
• Width (in.): 6.8
Battery Type
• Group Size: 31M
• Overall Type: Deep-cycle
• Battery Design: Absorbed Glass Mat
• Number of Cells: 6
• Container Material: Polycarbonate/polyester
• Maintenance: Maintenance Free
Power Ratings
• Amp Hours at 20 Hour Rate: 100
• Capacity Amp Hours at 10 Hour Rating: 92
• Cold Cranking Amps (CCA at 0 deg.F): 1150
• Reserve Capacity (RC): 205 min.
Warranties & Coverage
• Free Replacement Warranty Term: 36 months
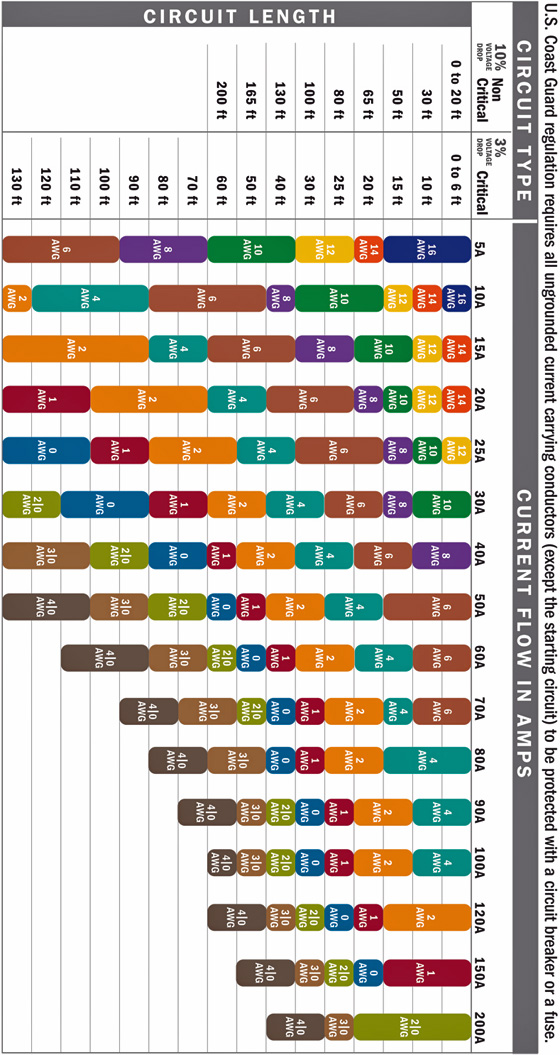
PLUGS, OUTLETS, AND CHEATERS
01 June 2014 00:00 Filed in: Maintenance
An appropriate warning ... the regular household extension cords are rated for 10A to 15A, the "special" household cords are rated for 20A, the marine shore cables are rated for 30A or 50A. Each rating has a different outlet/plug prong configuration for a reason.

Always use the appropriate cord/cable for the outlet prong configuration and you will sleep well. Having said that, there are "cheater" cables and "cheater" plugs called such for a reason. They convert prong configuration from one amp rating to another. When used, one needs to be very conscious of the limitations and consequences.

I do use "cheater" cable when boat is on trailer at home or in the marina for maintenance. My use of power is very deliberate and managed then. I never leave it ON by chance, and I never run a/c system, fridge, stove, microwave oven, etc when on cheater cable ... all individual 120V AC breakers are OFF but only those I need like battery charger and engine compartment heater, for example.
Can be done but very carefully.
Always use the appropriate cord/cable for the outlet prong configuration and you will sleep well. Having said that, there are "cheater" cables and "cheater" plugs called such for a reason. They convert prong configuration from one amp rating to another. When used, one needs to be very conscious of the limitations and consequences.
I do use "cheater" cable when boat is on trailer at home or in the marina for maintenance. My use of power is very deliberate and managed then. I never leave it ON by chance, and I never run a/c system, fridge, stove, microwave oven, etc when on cheater cable ... all individual 120V AC breakers are OFF but only those I need like battery charger and engine compartment heater, for example.
Can be done but very carefully.
SWAYING OR YAWING AT ANCHOR
01 May 2014 00:00 Filed in: Seamanship
As I have mentioned before, my boat behaves like a weather vane facing the wind wrong way. The reason is a fancy looking hull design with high bow with deep concave walls that act like well trimmed sails ready for close hauled action. Another side effect of this design is that the boat does not stay put on anchor in light to moderate wind conditions. It constantly swings 40 degrees to either side, like a pendulum … and drags the anchor as a result.
Here is the solution … from the work titled "Stay Put" by unknown (to me) author:
"Yawing at anchor is a function of 3 factors. The amount that the wind is veering by. The windage of the boat. The underwater configuration of the boat - a flat bottom boat will yaw more than a deep keel boat.
Setting up a bridle on a 24' boat will have little effect on the amount of yaw. The forward cleats are just too close together! Anyone remember the study of vectors and forces at school?
...
But here is a great way to hold your boat almost rock steady to the wind. It is a trick I learned a long time ago (not sure from where) but I used it many times on my sailboat. Like all things it is really simple to do but hard to explain in words but here goes:
The net result is that your boat will lie perfectly still at a slight angle to the wind. The wind will not be coming over the bow directly but over your forward quarter.
Hope my instructions are clear enough but it's worth trying it out. You will be pleasantly surprised."
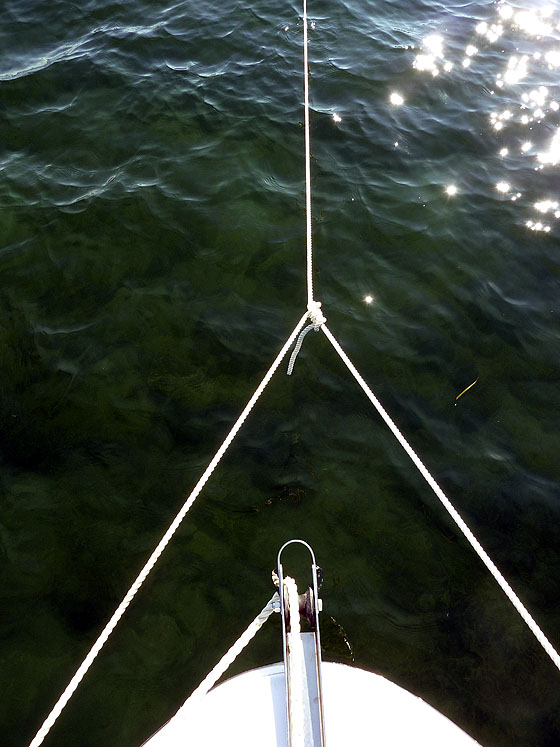
This is how this configuration looks like … anchor bridle is marked in red ...

Other way to minimize anchor dragging is the use of kellets ...
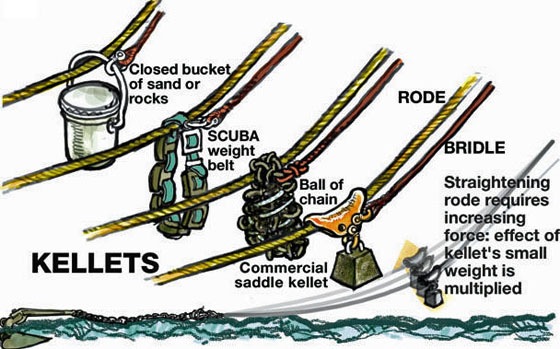
I am using my old chain in a similar way. Instead of a ball of chain lowered on the rode, I shackle it to the bitter end of chain section as I lower the rode and let it go to the bottom. There is one more step required when anchoring with kellet, and when raising an anchor in a hurry or at night that you must not forget to remove it as you pull the rode or you might damage the windlass and/or boat.
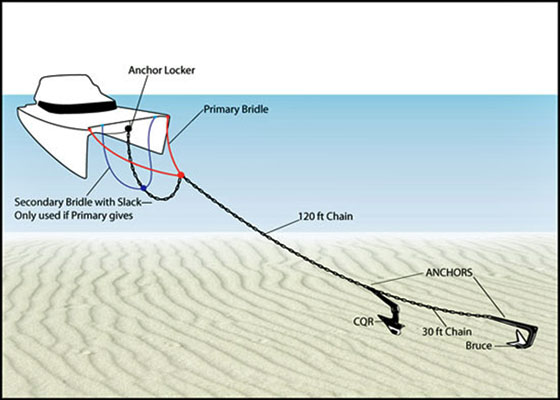
Here is an ultimate method to anchor a boat …
Here is the solution … from the work titled "Stay Put" by unknown (to me) author:
"Yawing at anchor is a function of 3 factors. The amount that the wind is veering by. The windage of the boat. The underwater configuration of the boat - a flat bottom boat will yaw more than a deep keel boat.
Setting up a bridle on a 24' boat will have little effect on the amount of yaw. The forward cleats are just too close together! Anyone remember the study of vectors and forces at school?
...
But here is a great way to hold your boat almost rock steady to the wind. It is a trick I learned a long time ago (not sure from where) but I used it many times on my sailboat. Like all things it is really simple to do but hard to explain in words but here goes:
- Set your anchor as usual.
- Now tie a long (say about 15m length) line - a 6mm diameter line should do - with a rolling hitch to your anchor rode just in front of the bow (ie between the bow and the anchor).
- Let out some more anchor rode - keeping slight tension on your secondary line- until the rolling hitch is about 1-2m under the water. Tie off your anchor rode.
- Now take the loose end of your secondary line and loop it round one of your stern cleats.
- Now for the final adjustment. Simply tighten this stern line, bringing the stern towards the wind until the boat no longer yaws and tie it off.
- More adjustment can be made by tightening or loosening the stern line as well as by adjusting the distance of the rolling hitch along the anchor line. The greater the degree of wind shift, the more you will need to pull the stern towards the wind.
- If you don't want to let out more anchor rode (as in step 3), then after setting your anchor and tying off you can just pull the boat forward by the anchor rode and tie the rolling hitch to some point and the letting the boost drift back while applying slight tension to the stern line (to stop the hitch from slipping initially).
The net result is that your boat will lie perfectly still at a slight angle to the wind. The wind will not be coming over the bow directly but over your forward quarter.
Hope my instructions are clear enough but it's worth trying it out. You will be pleasantly surprised."
This is how this configuration looks like … anchor bridle is marked in red ...
Other way to minimize anchor dragging is the use of kellets ...
I am using my old chain in a similar way. Instead of a ball of chain lowered on the rode, I shackle it to the bitter end of chain section as I lower the rode and let it go to the bottom. There is one more step required when anchoring with kellet, and when raising an anchor in a hurry or at night that you must not forget to remove it as you pull the rode or you might damage the windlass and/or boat.
Here is an ultimate method to anchor a boat …